 Skip to content
 How to Reset Your Garage Door Keypad (Even Without the Code)

Have you moved into a new home and discovered the previous owners didn’t leave the garage keypad code? Or perhaps your mischievous kids have changed the code, or you simply can’t remember the combination you set months ago. Maybe your keypad has stopped responding altogether. Don’t worry—resetting your garage door keypad is a straightforward process that you can complete in just a few minutes, even without knowing the original code.
In this guide, we’ll walk you through the simple steps to reset your garage door keypad, compare different brand-specific methods, and provide troubleshooting tips for common issues you might encounter along the way. Whether you’re wondering “how do I change my garage door code?” or “how do you change the code on your garage door?”, we’ve got you covered with expert solutions for all your garage door opener needs.
Step-by-Step Guide – Resetting a Garage Door Keypad
Let’s break down the process into manageable steps that will work for most garage door opener systems.
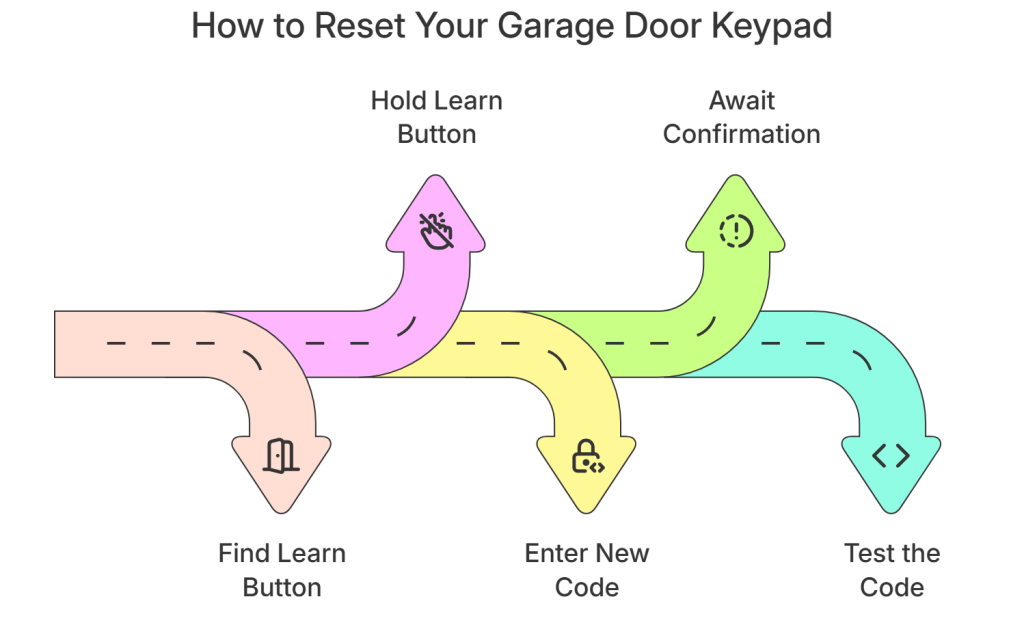
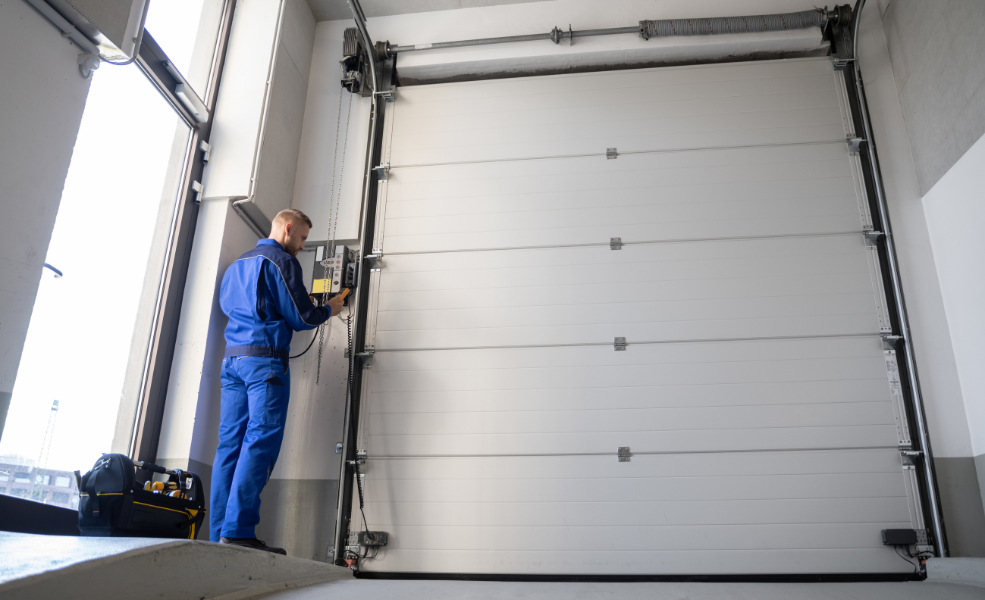
Step 1 – Locate the Opener Motor and the Learn Button
The first step in resetting your garage door keypad is finding the “Learn” button on your garage door opener motor unit. This button is typically located on the back or side of the motor unit that hangs from your garage ceiling.
- Look for a square or round button, often colored (commonly purple, orange, red, yellow, or green depending on the brand)
- You may need to remove a light cover or access panel to reach it
- Check for any wires connected to your garage door opener that might need to be accessed
- Look for a small switch near the motor unit that could be the learn button
- If you can’t find it, check your opener’s manual or search for your specific model online
This learn button is essential for programming both your keypad and remote control for your garage door system.
Step 2 – Press and Hold the Learn Button
Once you’ve located the Learn button, it’s time to clear the old programming from your garage door opener memory:
- Position yourself so you can reach both the opener unit and see the keypad
- Press and hold the Learn button for approximately 6-10 seconds
- Watch for the LED indicator light to blink or go out, signaling that all previous codes and frequency signals have been erased
- Release the button
- Check that the memory has been properly cleared by testing old codes
Important note: Don’t hold the button for too long (typically over 30 seconds), as this might reset other programmed devices like remote controls or disrupt the rolling code security feature that protects your garage door from unauthorized access.
Step 3 – Enter a New Code on the Keypad
Now that the system is in programming mode, it’s time to set your new password for your garage door:
- Go to your external keypad
- Check that all buttons on the keypad are functioning and not stuck
- Enter a new 4-digit PIN of your choice (some models allow longer codes)
- Press Enter, Learn, or # button (depending on your keypad model)
- Some keypads require you to press a specific sequence—refer to your user manual if available
- The keypad will typically send a signal to the opener to confirm programming
Choose a code that’s easy for you to remember but difficult for others to guess. Avoid obvious combinations like “1234” or your house number. This is the most common question we hear: “how do you change your garage door code?” and the process varies slightly by manufacturer, but these steps work for most systems.
Step 4 – Wait for Confirmation Light or Sound
After entering your new code:
- Look for a confirmation signal—usually a blinking light on the keypad or garage door opener
- Some models emit a clicking sound or briefly activate the opener lights
- The door sensor might flash to indicate successful programming
- Listen for motor movement or a slight hum as the system processes the new code
- Check that the frequency and signal between the keypad and opener are properly synced
- If you don’t receive confirmation, try the process again
This confirmation indicates that your new code has been successfully programmed into the system’s memory. The garage door opener has now stored your password in its internal memory.
Step 5 – Test the New Code
The final and crucial step is to test your newly programmed code:
- Close your garage door completely
- Wait a few seconds
- Enter your new code on the keypad
- Press Enter or the activation button
- The garage door should open smoothly
If the door doesn’t respond, you may need to repeat the programming process or troubleshoot further.
Special Case – Resetting the Keypad Without the Old Code
Lost your code completely? No problem. Here are methods that work even when you don’t have the original code:
Learn Button Reset Method
This is the most universal approach and works for nearly all brands:
- Follow the steps outlined above, using the Learn button to completely reset the system
- This method erases all previous codes and allows you to start fresh
Wall Control Panel Reset
Some newer models offer reset options directly from the wall-mounted control panel:
- Look for a “Lock” or “Learn” button on your wall panel
- Press and hold this button (sometimes with a combination of other buttons)
- Follow the blinking light pattern to confirm the reset
- Program your new code on the keypad
Brand-Specific Factory Resets
Many manufacturers have built-in factory reset procedures:
- LiftMaster/Chamberlain with MyQ: Use the MyQ app to reset codes remotely
- Genie Intellicode: Often requires a specific sequence of button presses on both the motor unit and keypad
- Craftsman: May have a reset pinhole button that needs to be pressed with a paperclip
Always check your specific model’s documentation for the exact procedure.
Comparison Table – Keypad Brands & Reset Methods
Brand | Learn Button Reset | Code-Free Reset Option | Programming Button | Notes |
LiftMaster | ✅ | ✅ (MyQ-enabled) | Yellow | Most flexible, compatible with most Chamberlain systems |
Genie | ✅ | ❌ | Red | Requires model-specific steps, often needs sequence of button presses |
Chamberlain | ✅ | ✅ | Purple or Orange | Uses Enter button for sync, newer models have wireless capabilities |
Craftsman | ✅ | ❌ | Green or Purple | Often paired with remote, may require simultaneous button presses |
Overhead Door | ✅ | ❌ | Red or Purple | Program button often located behind light lens |
Wayne Dalton | ✅ | ✅ (some models) | Various | May require holding “+” and “-” buttons simultaneously |
Frequently Asked Questions
What if my Learn button isn't working?
If pressing the Learn button doesn’t trigger any lights or response:
- Check that your opener has power
- Ensure the button isn’t stuck
- Look for alternative reset methods in your manual
- Consider a worn-out button that may need repair
Can I reset the keypad without erasing remotes?
Yes, most modern openers allow selective programming:
- Use the “Add” or “Program” mode instead of full reset
- Follow the specific instructions for adding a new device
- This preserves existing remote controls while allowing keypad reprogramming
How do I change the code without affecting other users?
For multi-user systems:
- Many newer keypads allow multiple user codes
- Program additional codes without erasing the main code
- Some smart systems let you assign different codes to different users
- Check if your model supports temporary guest codes
Is there a default master code for garage keypads?
Generally, no:
- Most keypads don’t have universal default codes
- Factory units usually require programming before use
- Some older models may have a factory code in the manual
- Newer smart keypads might have a temporary setup code
How often should I change my garage code?
Security experts recommend:
- Change codes every 3-6 months
- Update immediately if you suspect someone unauthorized has used it
- Change after contractors or service providers have been given access
- Consider changing seasonally as an easy reminder system
Pro Tips & Mistakes to Avoid
Smart Security Practices
- Document your code in a secure location (not on the keypad itself)
- Consider using a password manager app to store your garage door code
- Share the code only with trusted family members
- Create a naming system to help remember your code
- Use rolling code technology whenever possible for enhanced security
- Regularly check that your door sensor is working properly
Common Pitfalls
- Don’t press the Learn button too long or you might reset all programmed devices
- Avoid letting the keypad get wet, which can cause malfunction
- Keep battery-powered keypads fresh with annual battery changes
- Clean the keypad periodically to prevent stuck buttons
- Be careful when adjusting screws near the motor or keypad housing
- Check that all wires are properly connected and not frayed
- Test your garage door opener after any maintenance to ensure proper function
When to Consider Replacement or Professional Service
- Consistent failure to respond after multiple reset attempts
- Visible damage or cracked casing
- Issues with the motor or switching mechanisms
- Problems with signal frequency or reception
- Keypads older than 10 years might lack modern security features
- Consider upgrading to a smart keypad for enhanced functionality
- When troubleshooting becomes too complex, it may be time for professional garage door service
Upgrading to Smart Keypads
If you’re struggling with an older keypad, now might be the time to consider an upgrade:
- Smart home integration allows control via smartphone
- Temporary access codes for service providers
- Activity logs show when your garage has been accessed
- Weather-resistant models offer better durability
Backlit keypads provide better visibility at night
Troubleshooting Common Garage Door Keypad Issues
Before calling for professional garage door repair, try these troubleshooting steps:
- If buttons feel sticky or unresponsive, remove any screws holding the cover and clean the contacts
- Check all wires for proper connection and signs of damage
- Test the signal strength by moving closer to the garage door while entering your code
- Replace batteries if the keypad has weak illumination or delayed response
- Inspect the door sensors for proper alignment and cleanliness
- Check if the frequency needs to be reset due to interference
- Verify that the motor is responding to other controls like wall switches
- Test the remote control to see if it’s a keypad-specific issue or more general
Conclusion
Resetting your garage door keypad doesn’t have to be a frustrating experience, even when you don’t have the original code. By following the steps outlined in this guide and using the appropriate method for your specific brand, you can quickly regain access to your garage and set a new, secure password.
Remember to document your new code somewhere safe, test it thoroughly after programming, and consider updating it periodically for optimal security. Regular maintenance of your garage door system will ensure smooth operation and prevent costly repairs.
If you continue to experience issues after attempting these reset methods or have questions about how to change your garage door code, it might be time to consult a professional garage door technician or consider upgrading to a newer keypad system.
Need professional help with your garage door opener or keypad? Contact Lopes Garage Door Systems Inc. for expert garage door repair and maintenance services. Our skilled technicians specialize in all aspects of garage door service, from keypad programming to complete system installation and maintenance.
With these simple steps and tips, you’ll be back to convenient, keyless garage entry in no time!
